TABLE OF CONTENTS
Getting Started
To get started listing inventory with Stage Front, you must first PO your inventory into the portal.
Click on Purchasing and select New PO.

Search for the event you want to PO into the system. You can use the filters below the search box to narrow down the results or include parking pass events.
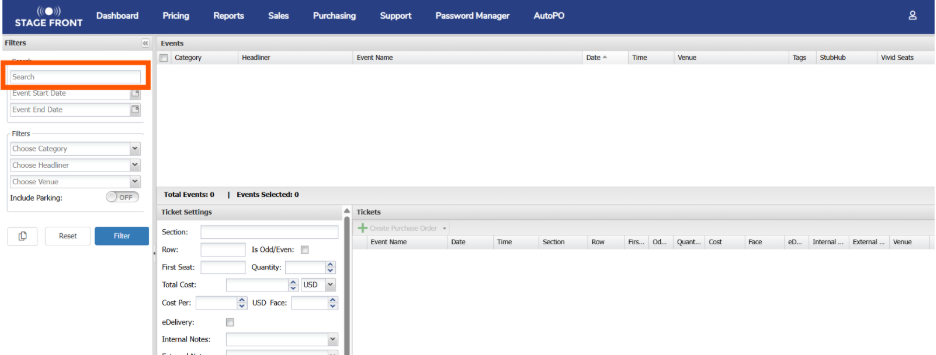
Select the event(s) you wish to add to PO into the system. Multiple events should be chosen for season tickets.
Please note that selecting multiple events will add that section/row and seat numbers to each event.

Ticket Settings
After selecting the event(s) you need to PO into the system, on the ticket settings panel, add the section, row, if it is odd/even seating, first seat, quantity of tickets, total cost and currency.
Cost per ticket will automatically populate based on the quantity entered and number of events selected. Please keep that in mind when entering the total cost.
Lastly, enter face value of the ticket if you wish to do so.
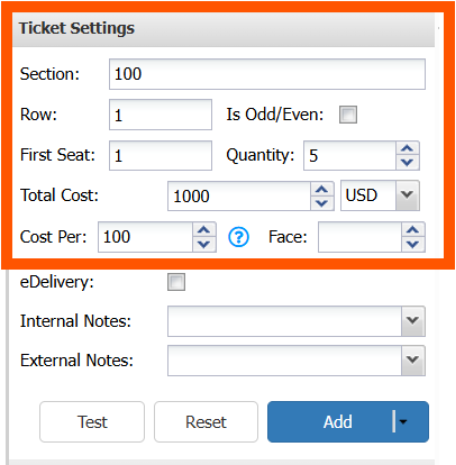
For mobile transfer delivery, tick the eDelivery box.
Internal Notes
Now, enter the internal notes by clicking the dropdown arrow next to the internal notes.

Fill in the following fields:
- Order ID: The order ID for the original purchase from the marketplace the tickets were purchased from.
- Email: the email address of the account the tickets are located in. (Required for mobile transfer tickets)
- No Password Manager: If the account the tickets are in is not in password manager, tick this box.
- Event Site: The site for the account the tickets are located in. For redelivery tickets including mobile transfer.
- Is Masked: Tick if the seat numbers are masked.
- Anonymous transfers: Tick if the tickets will be delivered by anonymous transfer.
- Exclusion list: Select any marketplaces you do not want the tickets listed on.
- Comments: Any further information that may be useful to our fulfilment team.
Once complete, click Save.
External Notes
Next, click on the drop down for External Notes.
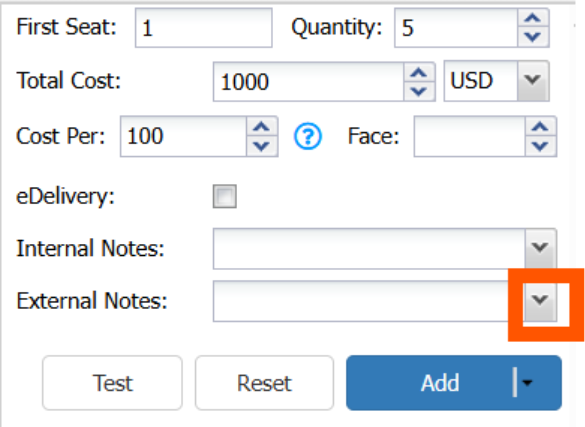
External Ticket Notes window is where any disclosures for your tickets should be entered and where you select delivery method.

IMPORTANT: Mobile tickets must also have e-delivery ticked on the main PO window.
Select all disclosures that apply and the delivery method. In the external notes comment box you can include any other disclosures such as any amenities included or if it is a rain or shine event.
Once completed, click Save.
Purchase Order Settings
Optionally, you can provide further purchase order information on the Purchase Order Settings pane.

These fields are not required but allow for better tracking of your purchases if you choose to use them.
Once completed, click the Add button.

Completing the PO Process
You may now continue to add other events to your PO pane following the steps above. If you have no other inventory to PO, click Create Purchase Order to complete the PO process and add the inventory to your portal.

Was this article helpful?
That’s Great!
Thank you for your feedback
Sorry! We couldn't be helpful
Thank you for your feedback
Feedback sent
We appreciate your effort and will try to fix the article